Photo workshops

Bad Photo Workshop Behavior

Bosque Blast Off (1 of 1).jpg

This is a post from 2015, but I decided to post it again after reading an article by Tony Sweet about bad workshop behavior in the Palouse.

I've been teaching photo workshops for about 15 years. I enjoy teaching and meeting people who share their passion for photography. What could be more fun, for the students and for me?

All my photo workshop students are courteous to each other - and to other photographers we meet on site. I stress the importance of being polite on the first day of the workshop. It's just common sense.

photogos 2.jpg

My philosophy: We are all in this together.

Well my friends, on my recent photo workshop to Bosque Del Apache, New Mexico I had an experience that made my blood boil.

Here's what happened.

We arrived on site, in the dark, at 5:30 AM. Several other workshop instructors and their students were already on site. That's all well and good. First come, first serve. That happens many times in very popular shooting locations.

Why arrive so early? The photo below that I took at sunrise says it all.

rick sammon 2.jpg

As one of my students was setting up her tripod in an open, yet tight, spot, a photographer walked in front of our student and said, rather curtly, "That's my spot."

My student responded, "It's an open spot No one is here."

The very rude student from the other workshop said, "I was here first, I'm setting up my second tripod." (It was a tripod with a second camera and a $3,000+ lens.)

I was shocked. I said to my student, "Hang in."

I walked around for about two minutes and found a clear spot for my student. She got wonderful images - as did all of our workshop students.

As usual, after all our students were set up with "first class" spots, I set up my tripod in "coach," behind the students, and in some cases next to the students where there was room.

On a side note, I often take pictures on site and show the students the shot to illustrate a composition or lighting technique. After all, one reason photographers come on my workshops is to see how I shoot.

rick sammon 1.jpg

The rude student could have said: "Let's try to squeeze in here together.  Let's get cozy. Let's try to make it work. We are all in this together." 

Here's another idea: "Her spot" was not her spot. If you leave a spot and come back in 10 minutes or 10 hours, it's no longer your spot. Right?

Post a comment if you like. I'd love to hear from you, especially if you have a "bad workshop behavior" story.

Of course, if you have a good behavior story, please share that, too!

Oh yeah, there was also a guy smoking a smelly cigar in the group. Not cool, especially at 5 AM.

rick sammon 3.jpg

Explore the light,
Rick

Day 1: Six Days of Africa Photo Safari Tips

Starting today, I am re-posting a series here on my blog: Six Days of Africa Photo Safari Tips.

I am running this series in preparation for my 2016 Botswana/South Africa digital photography workshop.

Check out my Beauty of Botswana gallery to see my favorite photographs from my two previous trips to this wildlife wonderland. 

Also check out my on-line class: Capturing the Wild: Safari Photography. You can use my tips for making great pictures on a photo safari (and even at a wildlife park).

Today's tip: Go on a foot safari.

Photographing from a vehicle is awesome, but a foot safari can't be beat. Below is a photo from a previous foot safaris in South Africa, along with some tips. Enjoy.

Not all camps offer foot safaris – where you actually walk on, rather than ride over, the African plains. But if the camp does offer this experience, go for it. It can't be beat for the thrill of being one with nature.

Is a foot safari dangerous? Not really. After all, your guides are not going to take chances. That means not getting super close the animals, but you'll be doing that anyway on your driving safaris. 

sammon.jpg

Camera gear is important, but before we get to that, dressing properly is also very important:
A) you want to wear clothes that blend in with the surroundings;
B) you want to wear good hiking boots.

Dressing in "lion hungry" pink and wearing sneakers, through which a thorn can easily penetrate, is not the way to go – as illustrted in the photo above.

Here are my camera gear recommendations for a foot safari.
- Two camera bodies. I use Canon 5D Mark III cameras.
- Wide-angle to medium telephoto lens on one body. I recommend a 24-105mm.
- Telephoto zoom on the other body. I recommend a 70-200mm f/4 (relatively light).
- Black Rapid duo strap, for easy access to both cameras.

sammon 1.jpg

The key of course to a good foot safari is a good guide – with an eagle eye. A good guide will spot animals, even if they are well hidden. I never would have seen this lion resting in the shade had my guide not pointed him out. Good thing our guide kept us at a safe distance!

I hope to see you in Botswana/South Africa. If you can't make an Africa photo safari, I offer wildlife photo safaris at Fossil Rim Wildlife Center in Glen Rose, Texas. That's where I took the photos above. Shoot me an email for 2016 dates.

Explore the light,
Rick
On a Photo Safari with the Canon 5D Mark III. Day 1: Giving credit where credit is due

Canon 200-400mm IS lens.

I'm starting a series of posts here on my blog: On a Photo Safari with the Canon 5D Mark III.

Today is Day 1.

As I will be sharing my favorite photographs from my recent trip to Kenya's Masai Mara, I thought it only fair that I give credit where credit is due - because I had a lot of help in the making of my images! Here goes.

© Rick Sammon 3.jpg

We would not have made the trip if it had not been for my friends and Canon Ambassadors Jonathan and Angela Scott. These guys made the trip a reality, so they get part of the credit. Follow my friends on Google+.

Simon Sitienei, expert guide/driver/Tuska Time organizer.

Simon Sitienei, expert guide/driver/Tuska Time organizer.

Our guide, Simone Sitenei, found the animals for us and got me into exactly - and I mean exactly - the best position for a photograph. That's skill. Credit due!

© Rick Sammon 5 .jpg

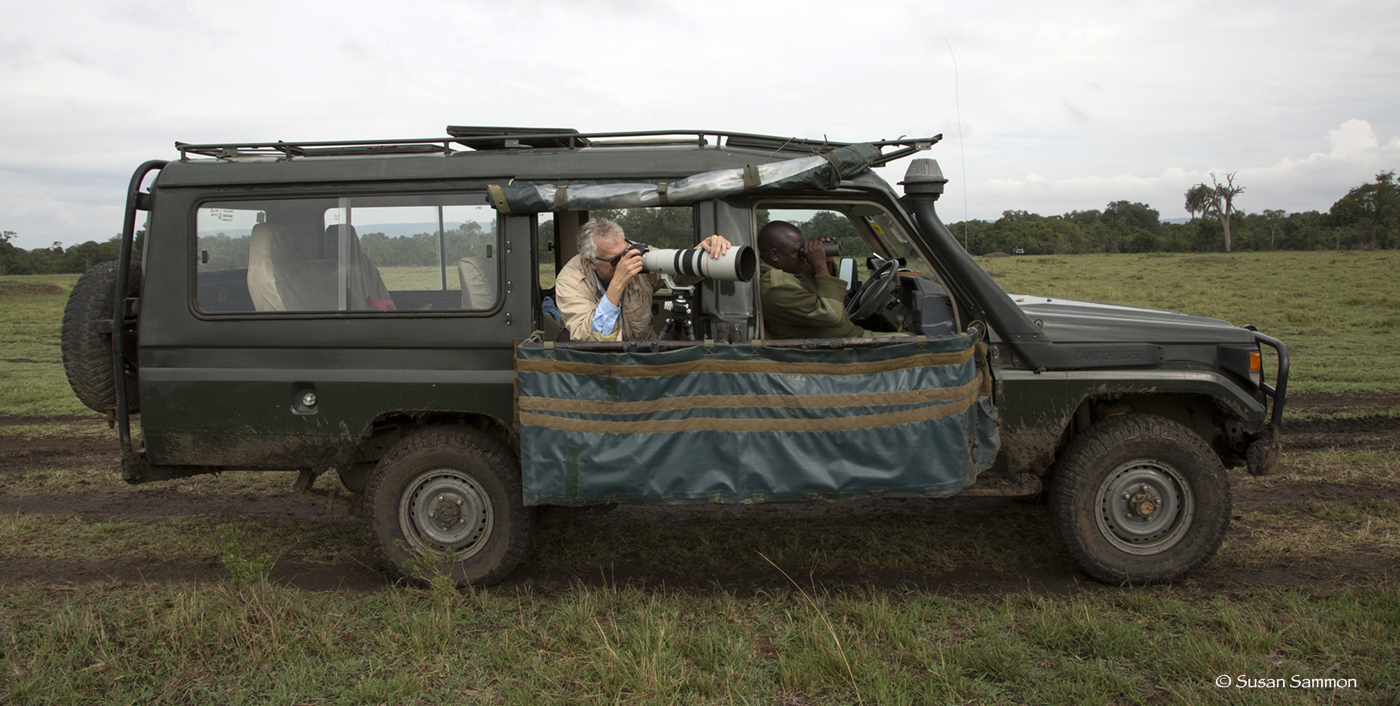
Jonathan loaned us his vehicle, customized for photography and videography, for the entire safari. Yes! This is one of the Big Cat Diary vehicles. My guess is that I got a much higher percentage of "keepers" thanks to having my own, awesome private vehicle.

Photograph by Jonathan Scott

Photograph by Jonathan Scott

I also gotta thank, big time, my wife/assistant Susan Sammon. Not too many "assistants" could put up with 9 days (starting in dark and ending at sunset) of "Quick, I need the 70-300, no the 200-400." Or, "Pass me the 24-105!"

Photograph by Jonathan Scott

Photograph by Jonathan Scott

I need to thank Canon for making some incredible cameras and lenses - and Canon CPS for loaning me the 200-400mm lens.

susan sammon.jpg

Susan makes cool images, too. She took the above image with her Canon PowerShot S110 - the perfect compact camera for fun (and awesome) shots.

Here is the camera/lens/settings info for the opening image for this post.

If you look closely in the opening image, (click to enlarge), you'll see a black and white dot above the male lion's eyes. That's a fly. Black is its body, white areas the wings. Kinda amazing.

Stay tuned for more images. 

During our "downtime" (ha ha)  at Governors' Camp, our awesome home base for the safari, we made a few videos. You can view them on my YouTube channel.

I teach photography, Photoshop and Lightroom on all my workshops. Can't make a workshop? Check out my on-line classes.

Interested in the gear I used on safari. Here is a QUICK look. :-)

Explore the light,
Rick Sammon,
Canon Explorer of Light


It's "Hey Rick! What's Your F-stop?" Wednesday #1

I am starting a new series here on my blog: It's "Hey Rick! What's Your F-Stop?" Wednesday. The series was prompted by the question I get asked most on my workshops.

Hey Rick #1

Photograph: Mandarin Ducks.

Location: San Diego Zoo, San Diego, California.

Camera: Canon 10D (I now use the Canon 5D Mark III) .

Lens: Canon 100-400mm IS lens @ 260mm.

Exposure: ISO 400. f/5.6 @ 1/180th sec. Exposure compensation: -1. Set at -1 to preserve highlights.

Reasoning: Use a fast enough shutter speed to stop the action – and these guys were moving kinda fast. After focusing on the eyes, use a wide aperture to set the background slightly out of focus, which will make your subject stand out in your image.

Concept: Shoot tight to capture the all beauty in details.

I hope to see you on one of my workshops.

Like stuff like this? Subscribe to my blog.

Explore the light,
Rick

P.S. My forthcoming Focal Press book, Creative Visualization for Photographers, has an entire chapter – with different photographs – on this topic.

What is Man Without the Animals?

rick sammon copy 6.jpg

"What is man without the animals? If all the animals were gone, man would die from a great loneliness of the spirit. For whatever happens to the animals, soon happens to man." – Chief Seattle.

When you are shooting around water, protect your camera with a waterproof or weatherproof case. Don’t change lenses when the wind is blowing. You may get salt spray on your camera’s image sensor.

Sea Lion Pup, Galapagos Islands

Tech info:
Canon 1Ds Mark II
Aperture Priority Mode
Canon 100-400mm IS lens @ 400mm
ISO 200 • 1/250th sec. @ f/8.0

This is a page from my app, Life Lessons We Can Learn From Mother Nature. See My Apps page for details.

If you like the stuff you see here on my blog, you can subscribe here.

Explore the light,
Rick

This post sponsored by X-Rite - Color Perfection from Start to Finish.