Canon 5Ds

Evolution of an Image: Black Bear Encounter in Yellowstone

"Hey Swapan, can you grab a photo with your iPhone of those people on the other side of the road who are too close to that bear?"

That's what I asked my new friend Swapan Jha – while our 2016 Yellowstone photo workshop group stood on the opposite side of the road photographing a black bear (circled below).

Swapan, a.k.a. The Raven, took a quick shot for me, which I knew I wanted to use in this blog post, and perhaps in a future book or seminar.

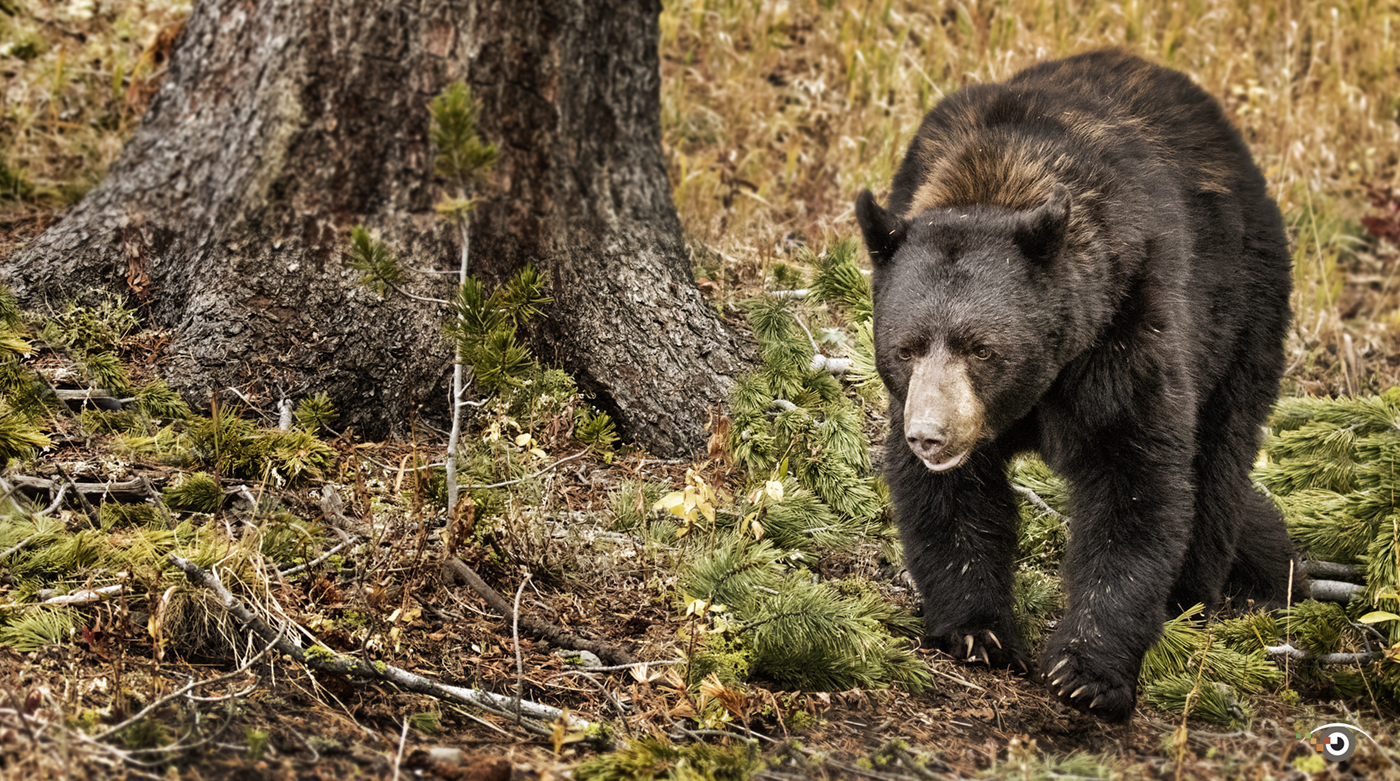
My idea: illustrate how a quck snapshot can be turned into a great shot, illustrated by the opening image for this post and the original image below, taken with my Canon 5Ds and Canon 100-400mm IS lens.

Swapan's photo also captures part of the bear-jam along the road. People went nuts trying to grab a photo. We even heard that a car fell off the road and into a ditch during this photo session. By the way, our vans were parked about 600 yards down the road to the left of where and I took our shots.

Before I go though my enhancements, the Canon 5Ds has a 50 megapixel sensor, giving photographers giant files from which they can make nice enlargements even when cropping in on an image.

The 5Ds also offer low noise at high ISO settings. Due to the relatively low light, I set my ISO to 6400 for this hand-held shot.

Here my are Lightroom enhancements:
• fairly tight crop;
• reduced highlights and opened shadows;
• increased Clarity;
• lightened the eyes.

In Nik Color Efex Pro, I used Tonal Contrast and then Darken/Lighten center to give the image impact.

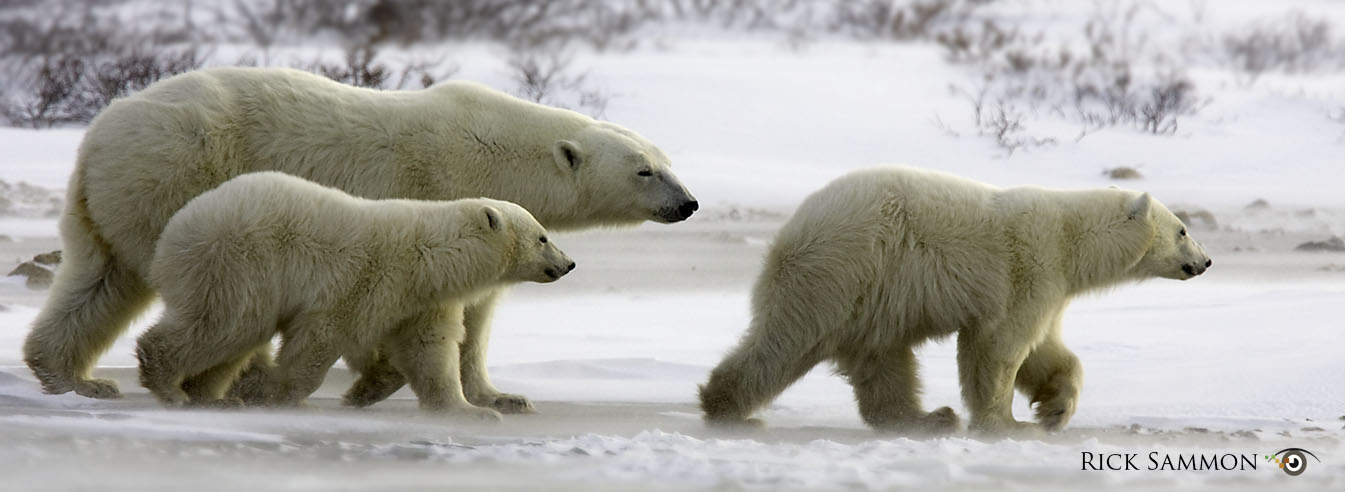
What "makes" the picture for me, as is often the case in wildlife photography, is "gesture." In this case, the black bear's legs (taking a step) and the look on his face. Gesture also "makes" the photo below of a mommy polar bear and her cubs, which I took in Churchill, Canada.

So: think gesture!

Gesture also "makes" the image below on the right, taken on the Mara, which is featured in my next (and 37th) book.

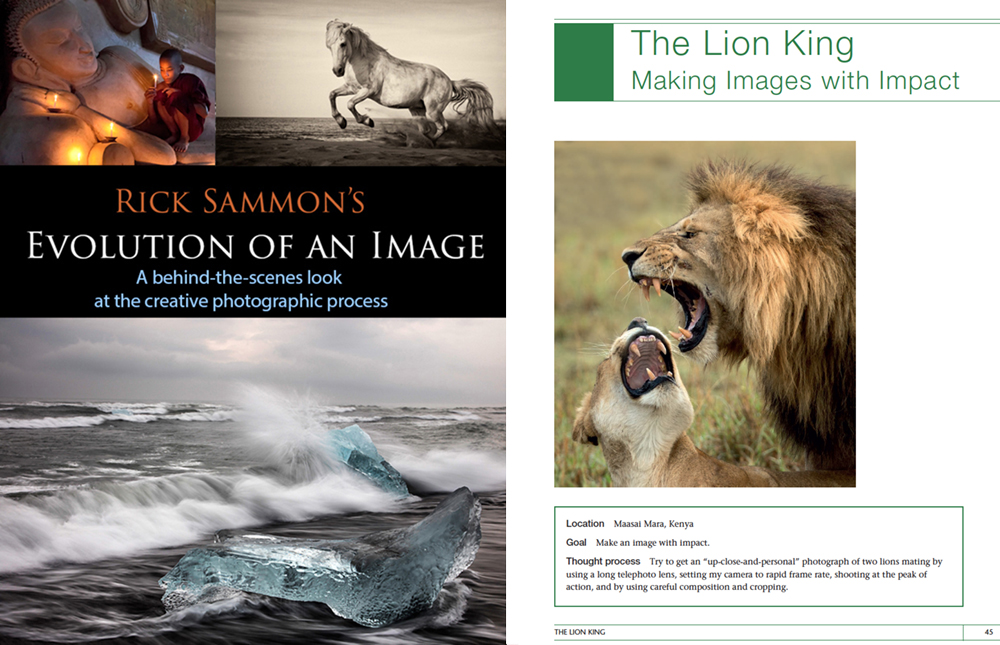
That's a super quick look at the evolution of my black bear image. In my next book, available October 5, I go into great detail for each image - from start to finish, including Lightroom enhancements.

Evolution of an Image is a follow-up to my best selling book, Creative Visualization for Photographers. I recommend that you read that book first, because it's more about getting the very best in-camera image.

Thank you again, Swapan - the Raven . . . and a very cool raven indeed!

Explore the light,
Rick

P.S. All the images in my books are recorded on Lexar memory cards.

One-Hour Canon EOS 5Ds Shoot: Making “Images with Impact”

Click images to enlarge.

When I teach a photo workshop, I begin by asking each participant, “What is your goal?” I ask that all-important question because setting a goal is important if you want to get a high percentage of good images.

Different photographers have different goals. I thought I had heard ‘em all, until a few years ago. One of my workshop participants, Gary Potts from Las Vegas, Nevada, responded, “I want to make images with impact.”

I helped Gary (a very good photographer by the way) achieve his goal. Gary, like many of my photo workshop participants, helped me, too. Now on my photo workshops, I often give the assignment: make images with impact.

Guess what? I often give myself that same assignment. That is what I did when I spent about an hour with Gary and my wife Susan at Techatticup, Nevada during Photoshop World 2015.

Here are my favorite images from the shoot, along with camera/lens info and some suggestions for making images with impact.

1) Opening Image - Alter time. When we alter time, but using a very fast or very slow shutter speed, we remove some of the reality from a scene. When we remove some of the reality, an image can have more impact. In the opening image for this post, I altered time by applying the Radial Filter/Zoom in Photoshop to the sky area of my photograph. That filter created the impression that my exposure was several minutes long (needed to blur very slow moving clouds), when in fact it was 1/200th sec.

To alter reality even more, I applied the Duplex Filter in Nik Color Efex Pro, which added a painterly-look to the image.

Info: Canon EOS 5Ds, Canon 14mm lens.

2) Above – Shoot HDR. I teach HDR on all of my photo workshops. When I teach HDR, I stress the importance of capturing the entire dynamic range of the scene: from the darkest area to the lightest area. This image was created from a seven-exposure set of RAW images. (Bracketing with 5Ds is quick and easy.) Notice how you can see into the shadows yet the highlights are not blown out. I used Photomatix (my #1 recommended HDR program) to create my HDR image. You can get a discount on Photomatix on my Plug-ins page.

Info: Canon EOS 5Ds, Canon 14mm lens.

3) Above – Get Up-Close-and Personal. If you want the person looking at one of your images to feel as though he or she was right there with you when you took the shot, shoot close to the main subject. Wide-angle lenses let us shoot close, the wider the lens, the closer you can get and still get good depth-of-field.

Wide-angle lenses also let you get everything in the scene in focus, which is how a scene looks to our eyes. The combination of shooting wide and close, and getting everything in the scene in focus, can produce an image with impact. And yes, the dramatic sky in this image, as well as the sky in the follow image, helps to create an image with impact . . . but remember: it’s the way the sky is captured (with a super-wide angle lens here) and processed that adds impact.

This is an in camera HDR (0 EV, -2 EV and +2 EV) image. For this and the following in-camera HDR image, I chose the Art Vivid mode.

Info: Canon EOS 5Ds, Canon 14mm lens.

4) Above – Go Ultra Wide. Following up on using wide-angle lenses, if you want an image with impact, going ultra wide can help. Ultra wide-angle lenses not only help us capture extra wide areas of a scene, but they also bend light and subjects in a cool and interesting way, which can produce an image with impact, as illustrated by the way the clouds are dramatically captured in this in-camera HDR (0 EV, -2 EV and +2 EV) image.

There is something else about this image that creates an image with impact: incredibly sharp detail, which is a testament to the capture quality of the camera’s 50.6 MP image sensor. And speaking of the camera's capabilities, the in-camera HDR is awesome.

Canon 5Ds, Canon 14mm lens.

 5) Above – Combine Techniques. This image combines a few image-with-impact techniques: shooting HDR (Photomatix again), going ultra-wide (Canon 15mm lens), getting it all in focus, adding some texture and color in Nik Color Efex Pro, and having an interesting subject, which of course helps us create an image with impact.

Info: Canon 5Ds, Canon 15mm lens.

6) Above – Use Plug-ins. Plug-ins can help create images with impact. Plug-ins can also help us awaken the artist within. I used the BuzSim filter in Topaz Simplify (also listed on my Plug-in page) to create this painterly-quality image, which is a close-up of a section of the rusting truck in the vertical image above. Yes, shooting close-ups is also a technique for creating images with impact, especially when you fill the frame with color and detail.

Info: Canon 5Ds, Canon 24-105mm IS lens.

If you want more tips, tricks and techniques for making images with impact, as well as some image-processing techniques, check out my latest (and 36th book), Creative Visualization for Photographers.

If you like photographing old cars, check out my Capture the Classics workshop in Atlanta (where I took this image) later this year. Good fun in an awesome location.

If you can’t make a photo workshop, check out my KelbyOne on-line classes.

Explore the light,
Rick

Canon EOS 5Ds Quick Field Test

Click images to enlarge.

At 9 AM this morning I took my Canon 5Ds, which arrived last week, for a field test. The location: The Chuang Yen Monastery in Kent, NY - which is about 30 minutes from my home in Croton-on-Hudson, New York and one of the locations on my Rick's Backyard Photo Workshop. Hey! I hope you can join me someday on this workshop, which I run twice a year. You will learn a lot and have a lot of fun. I promise.

My main goal for this quick test was to check out the sharpness of the files from this whopping 50.6 MP digital SLR - because one of the main reasons I choose a camera is image sharpness: I want/need the cleanest possible image. This is especially important, to me, when shooting in low-light/low contrast situations – which is why I chose this location for my test.

I created the opening HDR image for this post from a seven-stop, automatically bracketed sequence. To get the seven stops, I changed the Number of Bracketed Exposure from the default setting of 3 to 7. Setting AEB (Automatic Exposure Bracketing) is fast and easy with this camera. Note: you cannot set AEB when the camera is set to built-in HDR - and vice versa.

I used my Canon EF 15mm f/2.8 Fish-eye lens and my ISO was set to 160. My camera was set on a tripod.

I processed the series of images in Photomatix.

Above: To check the sharpness of my HDR image, I zoomed in on the two small sections of the original image you see here. Sharp and clean, as expected. And . . . keep in mind the statues are soft in and of themselves.

Above: Here's another set of images that illustrates the clarity of the images from this camera – as well as the sharpness of the Canon EF 14mm f/2.8L lens. ISO was 160.

When I zoomed in (right image) the original file not only revealed good detail, but I noticed something I had not seen before: a small carving of a Buddha in the headdress of the larger Buddha.

I used Live View for this shot, as well as for the previous shot. I like the camera's Live View feature because it tells you to Press the Set Switch for AF. Kinda cool. Speaking of cool, here's a cool feature of the 5Ds: Mirror Lockup . . . with the option of choosing a delay from 1/8 second to 2 seconds after pressing the shutter release button. Want to get the steadiest/sharpest shot? Go for mirror lockup!

And speaking of clean, I used the in-camera Long Exposure Noise Reduction feature to get an extra-clean shot.

Above: To digress (from the Buddhist temple but not from cropping) for a minute, being able to crop an image for an end-result image with more impact is important for me. Why? Sometimes,  I simply can't get close enough to the subject. Cropping gives me (and you) a second chance at composition - so the 5Ds gives me even greater cropping possibilities.

I grabbed the shot above on the right with my Canon 5D Mark III and Canon 70-300mm F/4-5.6 IS USM lens (set at 300mm) while on safari in Kenya. I shot quickly because I did not want to miss capturing the leopard's intense stare. Cropping my image produced a photograph with impact.

Learn more about composition in my KelbyOne class: Composition - the strongest way of seeing.

Above: Continuing on quest to test the camera's image quality, I photographed these small (maybe two inches high) Buddha statues. This is a hand-held shot taken with my Canon EF 17-40mm f/4L USM lens. My ISO was set at ISO 500. When I zoomed in on a statue near the middle of the frame (my focus point), I could clearly read the writing under each statue.

Above: Here's another 14mm lens shot. Above the painting you'll see just some of the 10,000 Buddha statues that surround the main statue of Buddha. I could not ask for a sharper image.

Above: After my quick indoor, low-light/low contrast test, I headed home to check my results – but not before making this image. I set my camera to the HDR mode and then chose the +/- 2 EV setting and the Art Vivid mode. Here, the in-camera HDR worked beautifully. In much higher contrast situations, I use Photomatix to process my images.

Well, that's my quick Canon EOS 5Ds field test. There are many other camera features I want to test, including the AF system. But that will have to wait. My son is home for a few weeks and I want to spend as much time with him as possible.

Speaking of time, for someone as hyper as I am, the review time of the images is noticeably longer than with my Canon EOS 5D Mark III, which I used for the leopard image. That increased time is especially noticeable when it comes to in-camera HDR. But heck, everything in photography (and life) is a trade off, and I'd trade a few extra seconds for awesome image quality any day.

That said, my Canon 5Ds will probably be my camera for landscape, portraits and subjects that don't move – although at five frames per second, it's fast enough to capture all the action I need to capture.

I'll probably still use Canon 5D Mark III as my main camera for action shots. I used that camera and the Canon 200-400mm IS with built-in 1.4x teleconverter for this shot of two lions mating in Kenya.

Above: Here's a shot taken with my Canon 100-400mm IS lens (new model). ISO was 400. I converted the image to black and white in Lightroom.

Again, I hope you can join me someday on one of my workshop. Lots of shooting, lots of processing and lots of fun.

Explore the light,
Rick
Canon Explorer of Light

What's new? My new (and 36th) book: Creative Visualization for Photographers - which features lessons on Composition, Exposure, Lighting, Learning, Experimenting, Setting Goals, Motivation and more!