phototours

It's "Hey Rick, What's your f-stop?" Friday #1

"Hey Rick! What's your f-stop?" That's the question I get asked most on my photo workshops. I reply, with a smile, "My friend. What is your creative vision, what is your goal?" Those are the important question - for photographers to ask themselves.

In this blog series I will share with you my goal and camera settings for some of my favorite recent photographs, which will be featured in my next (#37) book, Evolution of an Image (September 2016 publication).

Here goes.

Location: Iceland.

Goal: Convey the beauty of the grounded icebergs – gems of frozen water – framed by the slow and graceful moving surf, and positioned against a background of powerful, crashing waves.

Thought process: Compose a scene that includes the icebergs, the beach, the waves and the sky. Experiment with different slow shutter speeds, from 1/60th second to several seconds, to convey the power and beauty of nature.

Tech info:
Camera: Canon EOS 5Ds
Lens: Canon 24-105mm IS lens.
Filter: Tiffen 0.9 ND filter.
Tripod: Really Right Stuff tripod and Really Right Stuff ball head.

Camera settings: 
• Manual focus – to maintain sharp focus, because the moving waves could change the AF focus point, as well as slow down the auto focus process;
• High frame rate ­­– to capture the subtle differences in the flow and position of the waves;
• ISO 100 – for shooting at long shutter speeds, f/20 – for good depth-of-field, 1/6th second – to blur the movement of the water. EV -0.67 – to prevent highlights from being washed out.

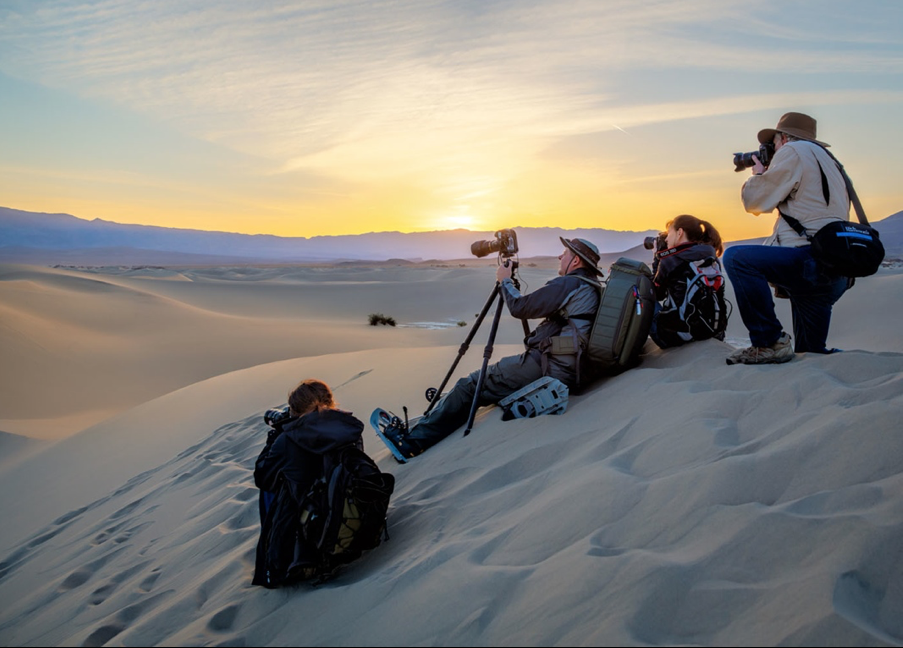
I hope you can participate in one of my photo workshops, where no question is too basic or too simple.
2016 Workshops
2017 Workshops
2018 Workshops

For more tips, tricks and techniques, see my current best-selling book, Creative Visualization for Photographers. Also check out my KelbyOne on-line classes.

Explore the light,
Rick

Gear Recos for My 2015 Photo Workshops

Above: You do not need all this gear for a workshop. It's a shot of the gear I took on an extended African safari.

"What's the best camera bag for the workshop?" "How about lenses?" "Is there a lot of walking or hiking?"

I get asked those questions in advance of my workshops. Here are my recos for my 2015 photo workshops.

For all workshops:
• Bring your tripod and laptop - and your enthusiasm for making great photographs!
• Pack hiking boots or hiking shoes, whichever is more comfortable.
• I travel as light as possible. I often have one camera on a Black Rapid strap and a lens/acessory in my photo vest - as illustrated in the Provence photo by Diane Eubanks below. My 70-200mm lens is on my camera; my 24-105mm lens is in a pocket. My backpack was on the shore, in sight.
• Roller bags are not recommend for on-site shooting. Some folks roll their gear onto the plane and then switch - on site - to a backpack or shoulder bag (shipped empty or stuffed with clothes in checked luggage).

Of course, workshop participants are welcome to bring all their gear with them for each shoot. In the image below, taken by Hal Schmitt, I have just two lenses (second one is in my tote). All the other photographers have lots of gear in their backpacks.

Speaking of traveling light, I talk about "The One Lens Shoot" and "What If You've Only Got One Shot?" in my new Master Landscape & Seascape Photography on-line class.  Save $10 with this code: landscapes.

Shippensburg, PA
Bag: Shoulder bag. No hiking. Mostly in one or two locations.
Lenses: Wide-angle zoom and medium telephoto zoom.
Other: Speedlite.

Fossil Rim, Texas
Bag: Shoulder bag or backpack. No hiking. We'll be photographing from safari vehicles.
Lenses: Mid-range zoom and long telephotos lenses, say up to 400mm.
Other: Speedlite.

Oregon Coast
Bag: Backpack. We'll be walking around most of the day at each location. The coast is usually a few minutes from your car. Some slippery rocks and slopes.
Lenses: Wide-angle and extreme wide-angle lenses, say a 14mm.
Other: NEOS overshoes, ND filter, head-mounted flashlight.

Casper, Wyoming
Bag: Backpack. We'll be moving from location to location. Cars will be nearby.
Lenses: Fast lenses, as you'll be photographing indoors at the Wonder Bar. Mid-range zoom and long telephotos lenses, say up to 400mm.
Other: ND filter, head-mounted flashlight, speedlite.

Provence
Bag: Backpack. We'll be walking around at each location. Cars will be nearby.
Lenses: NEOS overshoes, wide-angle zoom and telephoto zoom, say up to 200mm.

Croton-on-Hudson, NY
Bag: Backpack or shoulder pack. Easy walks to locations. Cars are nearby.
Lenses: Wide-angle zoom and telephoto zoom, say up to 200mm.
Other: ND filter, head-mounted flashlight, speedlite.

Iceland
Bag: Backpack. We'll be walking around most of the day at each location. Bus will be nearby.
Lenses: Wide-angle zoom and telephoto zoom, say up to 200mm. For night shooting, you may want a fast wide-angle lens.
Other: NEOS overshoes, ND filter, head-mounted flashlight. Warm clothes.

Atlanta, GA
Bag: Backpack. We'll be walking around Old Car City (open fields) and around the Railway Museum. Cars will be nearby.
Lenses: Speedlite, wide-angle zoom and telephoto zoom, say up to 200mm.

Bosque del Apache, NM
Bag: Backpack. We'll be walking to the shooting spots, which are not more than 5-10 minutes from our cars.
Lenses: Mid-range zoom and long telephotos lenses, say up to 400mm, or even longer. For night shooting, you may want a fast wide-angle lens.
Other: Head-mounted flashlight. Warm everything: gloves, hat and coat.

If you are looking to get new gear, my friends at Adorama have a wide selection to fit your needs and budget. You can borrow lenses from borrowlenses.com.

Click here to order NEOS.

Shoot me an email if you are booked on a workshop and have more gear or logistic questions.Of course, a follow-up email to all workshop participants includes more detailed info.

New to my workshops? Check out my new Master Landscape & Seascape Photography on-line class! Save $10 with this code: landscapes.

Explore the light,
Rick

"Photo Failed It to Photo Nailed It!" #2: Add lights to add drama to a scene

model car.jpg

From time to time here on my blog I'll run a post: "Photo Failed It Photo To Nailed It!" The concept is twofold:

1) I'll share a pair of pictures, along with tips, that illustrate how you can nail a shot;

2) You'll see that with a little effort - and sometimes by using accessories - you can turn a snapshot into a great shot.

This post: Add lights to add drama to a photograph.

Above is a failed shot from the shoot. The picture is flat and boring for two main reasons: boring and flat light and a boring pose. What's more, the background is overexposed.

To nail the shot, I . . .
• took an exposure of the background (a painted background) and then set the exposure exposure compensation to -1.
• used two Westcott Ice Lights – one positioned near the windshield and one positioned over the sunroof - to add shadows to the scene. Shadows are the soul of the photograph.
• directed the model and then moved in closer. The closer you are to the subject, the more intimate the photograph becomes.
• added props (sunglasses and cell phone).
• tilted my camera for the "dutch" effect.
• applied the Duplex filter in Nik Color Efex Pro. (All the plug-ins I use are listed on my Save on Plug-ins page.)

My camera/lens: Canon 5D Mark III and Canon 24-105mm IS lens.

As you can see, it did not take a lot of effort to nail the shot.

If you like model/people photography, I have a few 2015 photo workshops that you may enjoy.

Explore the light,
Rick

Today's Guest Blogger: Mike "Spike" Ince

pic1.jpg

My guest blogger today is friend Spike, a.k.a. Mike Ince.

Spike will be heading up the nighttime photo sessions on my Southwest Photo Caravan later this year. Info on my 2013 Workshops page. We hope you can join the photo fun - during the day and into the night.

Take it away, Mike.

A big hello to everyone out there!

Thanks to Rick for letting me have the opportunity to guest blog for a day!

I first met Rick on his Oregon Coast Photo Caravan. Then a few months later, with him and Juan Pons, I became fascinated with the astrophotography in New Mexico while visiting the Very Large Array.

Since then, I have been hammering out these photos striving to improve my techniques one photo at a time – both on the field and in the digital darkroom.

If you would like to try some shots like this, here are some starting guidelines for the Big 3: aperture, iso and shutter speed.

1.  The faster the lens the better. 2.8 is popular and works great, lenses with a larger aperture will work that much faster. All of my shots n this post are at f2.8, and of course wide angle lenses are ideal!

2.  A good starting point for ISO would be 1000 (start here and work your way up), but most of the time you will find yourself moving up fast. I tend to favor the 2000-4000 marks. Noise reduction can be cured drastically in Lightroom, Photoshop and a lot of plugins, so do not hesitate to bump it up if you need to.

3.  For shutter speed, most of the time I am between 20-30 seconds. If you want to avoid star trails, then keep it under 30. At 30 seconds plus, you will start to get star trails, which is a whole other ballgame (but a fun one). Of course you will need a tripod and it will also help to use a remote or set the self timer to 5 seconds or so. This allows the camera to stabilize after you touch it.

4.  When scouting a location, take a pic at 30 seconds (or longer) with the ISO sky high! That way you can create your composition and see whats really out there in the dark. Then play with the above settings.

Aside from these guidelines, here is some other things to keep in mind.

If your primary focus is the Milky Way, shoot on, or within a day or two of the new moon. The darker the sky, the better. If you want to include some foreground elements, then a little moonlight can help illuminate the scene. A quarter moon can be good for this. Just because the moon is not a new moon does not mean you are out of luck. Also keep an eye on what time the moon sets. Every month there will be time to catch the moon set and still have time before sun up to shoot away. There are plenty of free apps for both Apple and Android to figure out when and where the moon sets and some even have entire star charts.

pic2.jpg
pic3.jpg

You have awesome shots... now what? Now you enter the digital dark room! See my before and after pics above (the orange glow comes from the city lights. To avoid this you need to be FAR away from the metro areas).

You can accomplish all of your post editing in Lightroom or Photoshop, or even use a combination of both. I also use a combination of filters from both Nik and Topaz. A big key is blending images together to get your desired look. Sometimes I will use 1 filter (or sharpen, or color adjust etc.) and then blend that with another layer, taking elements from different layers I like. If using Photoshop keep everything on its own layer and use masking techniques to blend your final composition together. I believe this achieves the best results. A little from here, a little from there, and before you know it you have your final piece! Don’t hesitate to go crazy and experiment! Keep in mind these are just guidelines so do not hesitate to try something new and think outside of the box.

pic4.jpg

On my last shot I found a lonely highway and had 30 seconds to spare so I incorporated some light painting along with the Milky Way. Fun stuff!

I have been posting some of my shots on Google Plus and enjoy interacting with the communities there, so add me and see what’s next! I also recently launched my site which you can visit anytime as well!

You can see more of my work on my web site and on Google +.

• • • • • ​

© Rick Sammon.jpg

Above: Here's an HDR image I took of Spike on our Bosque Del Apache Photo Workshop.

Thanks, Mike, for a great post. See you under the starts on my Southwest Photo Caravan!

This post sponsored by x-rite. X-Rite is the global leader in color science and technology. The Company develops, manufactures, markets and supports innovative color solutions through measurement systems, software, color standards and services.

Check out these cool x-rite products:
ColorMunki
Passport Color Checker